Wednesday, February 29, 2012

Refresh a room with colors for spring!

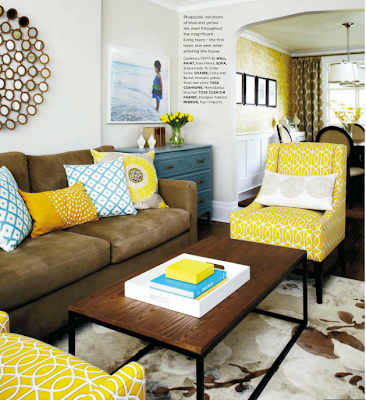
This room from "Style at Home" magazine is spring inspiration!

I loooved this room the minute I saw it and I thought it would be fun to "Build-a-Room" on a budget based on this gorgeous room.  I had fun searching high and low for accessible products that would give you the same look and feel as the room in the picture. 

Here's what I came up with!

Lets say we are starting with a basic neutral room. I know I tell you this all the time, but the foundation of every room should be neutral... no bright green or floral sofas! This allows you to add in colors you love, when you love them! Then anchor the room with a beautiful natural seagrass or jute rug for texture.  

Then start poppin' in the color! Start at Target for some cool lamps and this tray...not a huge investment, so you can justify changing them out when you are ready.


Next, I love adding in colorful accent furniture like the aqua chest of drawers in the picture, they most likely painted  it themselves - search thrift stores and flea markets for an inexpensive one to paint.

Try this deep Aqua Blue from Sherwin Williams:


Nothing changes the feel of a room like adding throw pillows...they are a designers best friend! I love these pillows from Target and Pier 1 ranging from $20 to $25. The yellow one in the middle is $68 from ATG.com. 


Finally, I think adding in pattern and color on your accent chairs is a great way to keep your room from being to predictable and it helps reinforce your color story. Again, Target is the place to go for this awesome slipper chair. Two flanking a fireplace or completing your conversation area are perfect!


I love natural rustic wood coffee table in the picture and I found this one on the Ballard Designs site for $349. Awwwsooome!

There you have it!  I just recreated the look of that beautiful room with everything you need to get the look for a little over $1000!

A lot of people look at a room and don't know where to start. Let this room inspire you and now I have given you the tools to recreate the look! You have every thing you need right here! So all I can say is go for it!

Friday, February 17, 2012

My uninspiring home office is finally getting done!

Yes, I am embarrassed, but this is what I am starting with in my office.
Most of us have a home office in our homes and yes, this is mine. I, too, have neglected rooms due to time and budget, but I am ready to tackle this task! I am taking you along for the ride.You can see the process I use before I start any project.

Function and Organization is Key

First, I need to assess how I need the room to function, because if I just make it pretty, it will look like this again before I know it. So organization is key. Here's some advice on how to get started.


Start with assessing what doesn't have a home. Looking at the floor, I obviously need something to store my samples and books. Shelves would work great in front of the window. Then look at what can go away or throw away and then do it!
I love this industrial shelving from Ballard Designs - it's a good contrast to the traditional heavy wood office furniture.


 Looking at the desk area, I need to get organized by giving specific areas for things to land. I am a stacker, so having stacked organizers will keep me in check. I like having my paint samples and fabric samples accessible so I will need something for those.


For the book shelves I will need baskets and magazine organizers to keep them organized and stylish. 


I will also need bulletin boards and wall pockets for my inspiration photos, fabrics, and projects. I will be on the hunt for over sized picture frames I can use for making my own - looks like I need to hit the thrift stores! Looove me some thrifting!


These Ballard bulletins are $75 and up! Let see if I can't recreate the look for cheaper with old picture frames and cork! I will hit Goodwill and the Flea market to see what I can find.


I can't tell you how important having vertical storage is in a tight space. These would work great. I just have to see if I can find them for less $$$! May check out The Container Store - it's organization heaven.

Now for Color and Style

Because the room is the first room you see when you walk into my house (Can you imagine how mortifying that has been!) it has to speak to my style and colors and flow with the rest of my home. My casual elegant style will be easy to accomplish with a little help from my good friends at HomeGoods. As for color, I will be using my same palette of wheat, cream, and robins egg blue. I do think I will use the deeper versions to coordinate with the dark woods. Plus the walls are a light beige and will give some contrast. 

 Pick out rooms on the Internet or magazines that inspire you! I do this all the time and even keep an accordion file with all my different rooms. 
Bringing in color and pattern will be essential to giving the office a designed look. Hope I can score something with this pattern. I love the trellis pattern!
Keeping my color palette in mind fabrics like these will work great! Maybe drapery?

I love the natural texture and color of burlap I will be using it in the room for sure!


The Project Inspiration Board

Never, never, never start a project without a plan! As a designer, I always make a board for my clients. Not only does it help us make sure we are on the same page, but it helps keep the project in check. This is the one I threw together this morning for the office. And yes, I would make it more professional looking for a client, I promise.


I just took all the projects from above and compiled them onto one board. You can even take it shopping with you to help keep you on track. I sometimes use a manila folder instead to make it easier to carry with me. 

Okay so now I am ready to shop and see what I can find (Okay we all really know what I have to do first - organize! Ugh!). Just an FYI my budget is $400 for the whole thing, so thrifting is key! I will start with the attic and see what I have that I might could "reinvent" to keep the budget down. I will let you know what I find.


Wednesday, February 15, 2012

Re-design a room with little or no money at all!

Is your guest room or bedroom needing some design love? Think you don't have the $ to give it an update? Well, I will show you two rooms I did for less than $200, yes for both! These before and after transformations will amaze you!

This was my neighbor's guest room 3 days before her parents were arriving for a visit! Yikes!  The challenge was she didn't think she could do anything because she only had a $200 dollars to work with. Creating Home to the rescue!
Working with an empty space is always the best way to start.
Believe it or not my inspiration came from the quilt from Better Homes and Gardens I spotted at Walmart! Yes that's right Walmart! I thought it had beautiful colors and a bohemian global feel and besides it was $20! Cha Ching! She didn't have a headboard, so I had to create a focal point above the bed using pillows and art. 


Now the room feels finished and inviting! Ready for guests!
I found these frames $10 a piece at Big Lots and I filled them with decorative paper that coordinated with the bedding. You can find this paper in your scrap booking section of your craft stores. I used inexpensive window treatments in a neutral tone from Walmart, as well. I anchored the bed with a wooden side table covered with fabric and lamps and accessories from Kirklands.

If you lean your pillow against the wall no one will even guess there's not a headboard!

Make cute and inexpensive accent pillows using this cool "no Sew" trick. Using a couple pillow cases that I picked up for $7.00. I filled the case with an "18 pillows and folded over the edge to create an envelope.  I then cut the excess fabric and folded and glued a clean edge with a glue gun. I added these buttons for a decorative touch. Easy Peasy!

This next room is my guest room a couple of weeks after we had moved in to our new home. I was broke and had to get creative.

I had nothing except a bed frame and mismatch side tables!

Luckily, I had this georgeous bedding a friend had brought me from Africa embroidered with the Ethiopian cross. I used another designer trick and "shopped my home" to pull this global inspired look together. I looked for anything that had that ethnic feel. Like things with natural textures and wood tones.
I felt like, if anything, it at least felt more warm and welcoming than before.
 I framed beautiful coffee bags from Guatemala and hung them above the bed to create a focal point. I used dark wood frames to add depth to the room and coordinate with the antique armoir and the dark embroidery in the bedding. 
Again leaning the pillow on the wall and art add the illusion of a headboard.


So what have we learned today? We don't have to wait until we have lots of money to redo our empty ugly rooms! We can shop wisely and "shop our home" to come up with a beautiful design that will get us through until we have the money to go crazy. It may take several years for that. No one needs to live with ugly for that long! So go forth and conquer those empty ugly rooms! No excuses! Let me know if you need my help with ideas or have any questions. As an SH Creating Home blog follower you can get free design advice, so be sure to join my site and ask away!

Friday, February 10, 2012

Take your great photos from the computer and turn them into art for your home!

I may be down, but not out!

It's amazing the ideas you can come up with when you are laid up in bed recovering from surgery. I have been going crazy in my bed for 3 days straight! Of course, as obsessive as I am about design, all I could do was think about ways I could take my bedroom to the next level!
It's a good start, but lacks that "Wow" factor
The look I'm going for is natural elegance. To minimize spending, I had to think of ways I could use things I already have. Like most people I have beautiful photographs just sitting in my computer. I thought why not use them as art. So by using some of the pictures my husband took in Denmark and London around the room, I can create the look of natural elegance with spending much money. Here's how I plan to do it.

This is the one I will be blowing up and putting over the bed. The art over the bed now is too small and lacks impact! I will have this printed on a wrapped canvas in a larger scale. Try www.canvasondemand.com, it's not that expensive and it lasts forever!
I did the picture in a sepia tone to match the neutral tones of the room.

This picture is an example of some of the gorgeous architectural photos from London that I will use in a grouping of 6 over the dresser. Right now I have nothing there, so anything will be an improvement! Using the pictures in a larger grouping with the same frames and mats will give it more impact.

Make sure you do them in 8 x10 at least, to give the content more importance.

I have a gray tufted chair sitting all alone on one wall and I think adding a leaning mirror and some rustic sconces will add some dimension to that side of the room. Plus it will add function to the room, by giving me and my husband a dressing area.

Okay, now that I have a plan, I need to get better, so I can start putting my ideas into action! Yes, of course, I will take you along through the process, so you too can be inspired to take your pictures off the computer and use them as art or inspiration for a room in your home.

Saturday, February 4, 2012

Quick and Easy Super Bowl Recipes!

It's a Super Bowl Fiesta!
This years I decided to stick to simple and quick recipes, so I wasn't cooking and prepping all day for the "Big Day"! So I am going Mexican. I like it because at least your mixing in some healthy and fresh ingredients.

First up: Appetizers!

Guacamole! My Fave is Cilantro Lime!
2 Ripe avocados
1 clove garlic
1/2 cup finely chopped onion
1 bunch fresh Cilantro finely chopped
Juice of 1 lime
Salt and pepper to taste

Mix all ingredient together and serve with chips!

My Semi-homemade Salsa (and super easy!)
2 cans of Cilantro Lime Rotel
1 or 2 gloves of garlic
1/2 tsp of cumin
I add a little squeeze of the fresh lime, too 
Salt and pepper

Blend all ingredients together in your food processor. Enjoy the fresh taste! I serve with Lime Chips.

Cream Cheese Taco dip:
1 8 oz package of cream cheese (softened) You can also use whipped version for easier mixing.
1 cup of sour cream (light works too)
1 pkge of Taco seasoning (I like using the Cheesy version - you can never have too much cheese!)
1/2 cup of shredded cheddar cheese

Mix all ingredients in a bowl and serve with corn chips or your favorite tortilla chips.
*You can make this a layer dip if you want to add a can of refried beans to the bottom and layer on some shredded iceberg, tomatoes, and jalapenos or black olives.


Next is Main Course "Touch Down Chili" from McCormick


Friday, February 3, 2012

Easy handmade wall art!


A little color and functionality really adds some needed personality to a bland reading area!

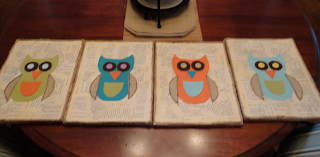
After visiting my daughter's 4th grade classroom last week, I notice the reading area had nothing! It was not comfortable and bland and boring! So, as usual, my creative juices started flowing and I came up with a plan. Using left over fabric from a client's job I covered these Euros for a comfy place for the kids to lounge. Then with four $3.50 canvases, I made this owl art out of left over fabric samples and an old book.

Supplies: art canvas, old book, scraps of fabric or paper, scissors, Mod Podge, Hot glue, and buttons


 Here's how I made this super cute wall art
  1. Cover your canvas with torn pieces of a book using glue, like Mod Podge.
  2. Paint the edges of your canvas to give it a finished look.
  3. Cut out your owl pieces - I Googled "Owl Template" - using fabric (felt works best) or paper.
  4. Using a hot glue gun, assemble the pieces of the owl onto the canvas
  5. I used Jute string to finish around the edges of the canvas

It truly was that easy! Now the kids have a comfortable and inviting place to read!