Wednesday, December 14, 2011

Super Easy Homemade Napkin Rings

These napkin rings can be used as place card holders, too!
Ever get caught with a more quests than napkin rings? I seem to have a lot of sets of 4 napkin rings and will sometimes just mix and match to make it work.  This time I decided to get creative in a pinch - literally! This napkin ring does double duty as a place card holder!

You only need a few simple items:
Glue gun
1" burlap ribbon (or cut pieces into ribbon size)
6 to 8  2" curtain rings with clips
6 to 8 old buttons
Floral wire


Here's how to make it:

  •  To form the bow just fold ribbon in a crisscross and hold, then pinch middle and secure with floral wire.
  • Glue button to the center of bow.
  • Holding the clip out and ring secure, hot glue bow to ring so that the clip is in the middle of the bow.
  • Pull napkin through the ring and clip a special note or name card to the ring. 
Be sure to have fun and be creative! You can use any type of ribbon or vary you colors!

Monday, December 12, 2011

Burlap, Branches, and Bows!


So, this year I decided that I wanted to start over! Out with the old Christmas decor and in with the new! But as you know, the holidays can be expensive, with presents to buy and parties to host. So I knew I had to get creative! Using simple items like burlap, branches and bows,  I created a beautiful holiday home!

I set out to get a few things to work with:
1 yard of burlap -$4.25
4 sets of blue, green, silver ornaments : $25
1 batch of icy branches - $21
1 spool 2"green wire ribbon - $4.99
1 spool of aqua/blue grosgrain ribbon - $2.99
Extra branches from the Christmas tree - Free
Branches from the yard - Free
Pine cones - Free
Total cost - $58.28 That's just a little over $50!

This week I want to share with you all of the homemade holiday projects I made using the above items.  I will also include instructions. Let's start with the front door!


 Here's what you need:
Glue gun
Grapevine wreath
Large wooden letter
Branch of garland
Pine cones
4 8" strips of burlap
Grosgrain ribbon
Floral picks

To start the project hot glue your wooden letter at the corners and attach to the wreath. Then glue your branch of garland to the bottom right hand corner and secure with floral wire. Then you need to glue your pine cones to the center of the garland.
Make each bow piece separate and attach the floral pick
Next glue a strip of ribbon down the middle of each of your burlap strips. Cut 2 strips into the bottom bow parts about 6" in length and cut a triangle at the bottom edge. You will need to gather each strip and attach to the floral picks. Take the other 2 strips and fold in half for the upper part of the bow. Gather those pieces at one end and attach to the picks, as well. I added a dab of glue to secure the picks.

Finally, just tuck the bow pieces into the pine cones to create the full bow. Make sure your pieces are all secure before you hang it on the door.

Enjoy your simple new holiday wreath!

Thursday, December 1, 2011

Three-way Thursday - Quick, easy, and free Holiday decorating!

Three ways to use the clippings from your Christmas tree to decorate around the house.
Use them to create a beautiful mantel display
I just asked the guy at the tree farm if I could have the branches leftover from the tree trimmings and he let me take as much as I wanted, FREE! By cutting them into smaller branches, I used them to create this beautiful mantel display. I used a grouping of pine cones from the yard and spread the branches out from there. I tucked in a string of lights and votive candles to add sparkle. All the other accessories were already on the mantel. The birds and vase of branches just added to that "winter wonderland" feeling I was going for.


Make a spray to use on mirrors or anywhere you want!
This one is easy and can be used all around the house. You can even make a larger one for the front door. All I did was group the sprigs together and tie together with floral wire. Next I added ornaments on a string to make it more interesting. Then I simply added a burlap bow to the top and hung it on my iron art in the dining room. So simple!

Tuck them around a candle
Simply tucking the branches around a hurricane candle holder helps give this entry way table  and dining room table that Christmas feeling! Again, I added candles, icy branches, and pine cones to pull it all together.
Create a holiday center piece for the table

With Christmas just around the corner, finding ways to save money is a must. I love that I was able to create that wintery holiday feeling by using natural elements, like tree branches, pine cones, and burlap, around the house. I love that wonderful smell of a fresh Christmas tree!  Best of all it cost little to no money at all! 

Please note they will eventually get brittle, they will usually last about 2 to 3 weeks.

Wednesday, November 23, 2011

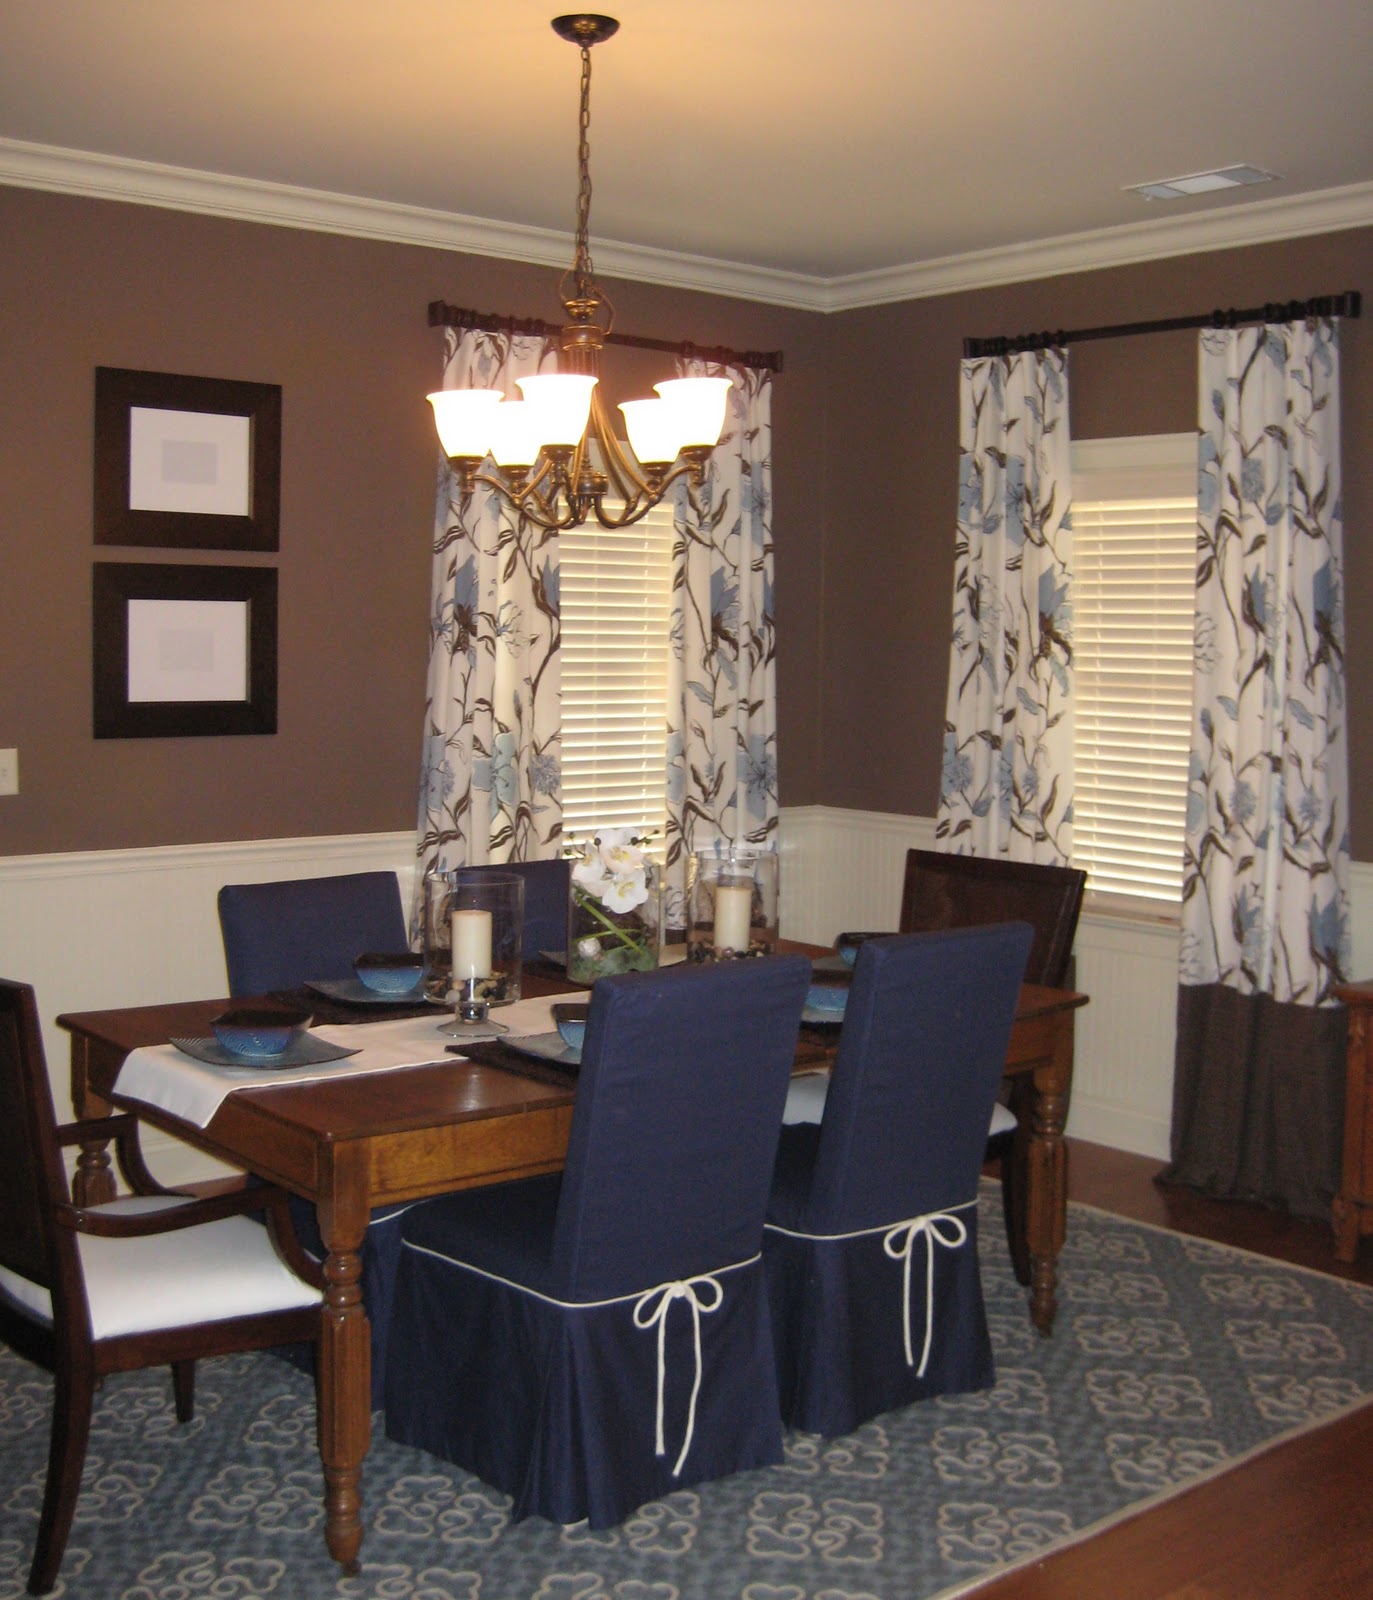
Blending the Old With the New

I know many of you have this same dilemma that my clients had. You are stuck with hand-me-downs that you can't afford to or bring yourself to get rid of. Here I will give you some ways to give that old set some new life!
First find an inspiration fabric or something to start you off and build from there. We found this traditional print done in a fresh new way at Calico Home and used that as our starting point. We pulled in the wall color from the fabric which is BM Whitall Brown, then added the off white bead board wainscoting to keep it from feeling too dark. We made the drapes out of the fabric and to keep the cost lower we added an inexpensive brown to the bottom. We only needed 2 1/2 yards of the printed fabric per panel.You can do this trick with store bought panels, as well.
Grandma's Dining set is given new life!


If you have older chairs, we just slip covered these and added two new transitional chairs to the head of the table.  Now the set feels more up-to-date! The rug really adds that hit of contemporary to the room. We found this gorgeous dhurrie rug at William Sonoma Home on sale, it was a little bit of a splurge, but the result was worth it! The final touches like new dishes and accessories really pulled the whole update together. Now she and her family can have that sense of history by keeping Grandma's pieces. But at the same time, enjoy a fresh new dining room that reflects them. It's the best of both worlds!

Tuesday, November 8, 2011

My "real life" take on dining rooms!

They are the most neglected room in the home, but usually the first room you see when you walk in the door. Yes, we want them to look good, but how do we create a room that welcomes guests and can be used on more than just the special occasion? Here's my philosophy on creating a "real life" dining room.
Keep it casual and inviting!
I feel the biggest mistake we make is we create this formal space that is filled with the traditional dining "set". We paint the walls dark reds or brown and think we can only use the fine china. Then we  neglect the room for the other 362 days of the year! That is such a waste! Here's are the elements, as seen in the picture above, that I think make a more inviting space that you will use so much more than 2 or 3 times a year.

1. Keep the colors brighter - I love using blues and greens or versions of those colors against the deeper browns of the wood. You can also use warm soft neutrals, like It keeps the room from feeling heavy, dark, and stuffy!


2. Make the furniture more casual - I like using upholstered chairs, because they create comfort and make you want to hang out and relax at the table. I also think mixing in a different chairs or a bench to keep it casual is a fun idea. Mix in a more casual table. I love round tables, because they promote conversation. Then add in  a buffet for storage and serving. Just remember all the pieces don't have to match! You can even just slip cover an old console table.
A simple slip covered console keeps the room light and casual


3. Keep the decor simple and casual - You are not going to use the room if you have to unset the table and remove a bunch of bulky decorations every time. So a simple center arrangement is all you really need. If you have a long table add 2 candles on either side of the centerpiece. I like using baskets and natural elements to keep the feeling light and casual. Put your centerpiece on a woven tray or try a jute or sisal rug instead of a formal wool rug, plus it's less expensive!

Voila! The room will be ready to use! 
  • Use it for a change of scenery on the weeknights and make spaghetti night a little more special!
  • Don't have a sitter? Use it as a special date night room on the weekends to give a more elegant and romantic setting for dinner for two.
  • We use ours every Sunday as our breakfast room. Bacon just tastes better served in the dining room!
Most of all enjoy gathering together  and spending quality time with friends and family. I mean isn't that what "creating home" is all about!

*If you enjoy my blogs, please become a follower and share me with your friends!


Saturday, October 29, 2011

Sumptuous Saturday

Hola Fall!
SH/CH is now adding Sumptuous Saturday's to my weekly Creating Home blog and posts. I want to share an easy recipe and help set the table for some family time! This week we are taking fall south of the border. Always a family favorite!
Please feel free to share your favorite family recipes.
Create a special setting, even if it is just a Saturday night!
 Nothing welcomes the cool evenings of fall like a warm bowl of soup. This week I am sharing one of my quick and easy soups with you, Cheesy Taco Soup.  
Muy Delicioso!
Recipe:
2 cans of chicken broth
1 can of water
1 can Rotel Cilantro Lime flavor
1 package of Old El Paso Cheesy Taco seasoning mix
1 cup of corn
1 cup of black beans
2 cups of pulled rotisserie chicken
Serves 4
Combine all ingredients (you don't have to be exact with the measurements) in a large pot and simmer for 15 minutes. Serve with corn chips and sour cream for a yummy topping. 
You can double the recipe to serve more - and have left overs! 


If you like my blog follow me and share me to enjoy creative, practical, and budget-friendly advice to help you create your home!

Friday, October 14, 2011

Creating Cozy!

Bright and Airy Summer Decor

Goes warm and cozy for the cooler months!
Pillows From World Market all under $100
I have to admit, I was a little worried about how to take my living spaces from my bright fresh light teal blues and greens to the warm and cozy feeling we all crave in the colder months. Here's the easy of it all. Just change out your pillows! Pop in a warmer color and add deeper versions of the colors you already have! It will work I swear! My light smokey teal pillow paired beautifully with burnt orange and deeper teals to create that curl up by the fire feeling I wanted! Then just splash the same colors around the room in candles, fresh flowers, and accessories.
Now all I need is a fire!   


I added these cozy orange floor pillows beside the fire place by covering euro size pillows with some left over fabric from another project. Now there is a reason to get cozy by the fire! Other small touches like the deep teal candles and the orange flowering branches, add more of those warmer tones. A homemade spray of leaves, berries and pine cones finishes off the fall look!

See it's that easy! Now go and cozy up those rooms, cold winter nights are just around the corner!